
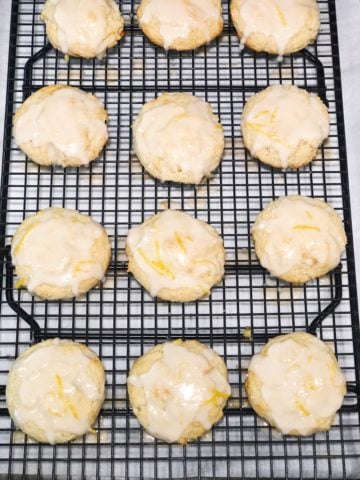
These vanilla pizzelle with browned butter are a delicious twist on traditional pizzelle and are so easy to make. They are perfect for a sweet treat or dessert for any occasion!

These vanilla pizzelle with browned butter are one of my new favorite flavored pizzelle and there are no extra pizzelle steps except browning the butter. This pizzelle is a cross between a brown butter cookie and a traditional vanilla pizzelle.
I do love making classic anise pizzelle, but sometimes it is fun to change it up. You can call this a modern pizzelle and believe me when I say, that Italians like myself love changing up the flavors of pizzelle to keep things interesting 🙂
These are great anytime and so delicious.
What You Will Need

- Unsalted butter
- All-purpose flour
- Anise Extract (or oil)
- Granulated sugar
- Vanilla extract
- Kosher salt
- Baking powder
- Eggs: I like to use large eggs.
Making The Vanilla Pizzelle Batter

- Mix dry ingredients: In a large bowl, whisk the eggs, vanilla extract and sugar and mix well.
- Add Dry Ingredients: Mix the flour, salt and baking powder in a medium bowl. Then add this to the wet ingredients and mix well.
- Add melted browned butter: Now add that melted browned butter and mix until combined.
Cooking The Pizzelle In The Pizzelle Iron

- Preheat the pizzelle iron: according to the manufacturer's instructions.
- Make the pizzelle: Scoop a tablespoon of dough onto your pizzelle iron and then close it, and cook for about 30 seconds to one minute or until the pizzelle are a light golden color.
- Cool: Once the cookies are ready, gently scoop them off with a spatula and place them onto a cooling rack.
How To Brown The Butter For The Vanilla Pizzelle
Browning butter is very easy to do. Just follow these steps to get the perfect flavor.
- Cut the unsalted butter into small pieces to ensure even melting.
- Place the butter pieces in a saucepan or skillet.
- Heat the pan over medium-low heat and let the butter melt completely. Once melted, reduce the heat to low to prevent burning and stir occasionally.
- As the butter cooks, it will begin to foam (this is normal).
- Keep a close eye on the color of the melted butter as it starts to turn from pale yellow to golden brown. Remember to stir occasionally for even browning.
- Once you start noticing brown specks forming at the bottom of the pan and a nutty aroma fills your kitchen, remove it from heat.
- Transfer the browned butter into a separate container to stop it from cooking further.

Storing
- Storing: To keep these cookies really crisp, it is best to store them in an air-tight container and eat them within 3 days.
- Freezing: You can freeze pizzelle. Allow them to cool completely then wrap them in parchment paper then place them in a bag, making sure to get as much of the air out of the bag as possible. Freeze for up to one month. Thaw them by placing them on the counter in the bag and let them come to room temperature.
Pizzelle Making Tips
- When the steam slows down check the pizzelle: Instead of guessing how long to cook the pizzelle in the pizzelle iron, I like to look at the steam coming off of the pizzelle iron. When the steam slows down, I start to check to see if the pizzelle are done.
- Cook the pizzelle to your level of doneness: I like my pizzelle to be a golden color but you can cook them longer or shorter depending on your preference. Just make sure to cook them long enough so they become crisp.
- Allow the pizzelle to cool on a cooling rack: The cooling down process is when the pizzelle becomes crisp. make sure to cool them on a wire rack so they cool completely.
Recipe FAQs
The browned butter will be a deep yellow color with brown flecks when it is ready.
Yes. You can substitute 1:1 with vanilla bean paste for the vanilla extract.
If your pizzelle maker has a non-stick coating, you do not need to oil it. If it does not, follow the manufacturer's instructions for how to oil the pizzelle plates on the iron.
More Italian Cookie Ideas


Vanilla Pizzelle With Browned Butter
Video
Equipment
- pizzelle iron
Ingredients
- 3 large eggs
- ¾ cup sugar
- 1 ¾ cups all-purpose flour
- 2 teaspoon baking powder
- 2 teaspoon vanilla extract
- 8 tablespoon melted browned unsalted butter
- ¼ teaspoon kosher salt
Instructions
Browning The Butter
- Start by cutting the unsalted butter into small pieces to ensure even melting.8 tablespoon melted browned unsalted butter
- Place the butter pieces in a light-colored small saucepan or skillet to better monitor the color change during the browning process.
- Heat the pan over medium-low heat and let the butter melt completely. Once melted, reduce the heat to low and stir occasionally with a wooden spoon or spatula to evenly distribute the heat.
- As the butter cooks, it will begin to foam and bubble - this is normal and indicates that the water content is evaporating. Keep a close eye on the color of the melted butter as it starts to turn from pale yellow to golden brown. Swirl the pan occasionally for even browning.
- Once you start noticing brown specks forming at the bottom of the pan and a nutty aroma fills your kitchen, remove it from heat immediately.
- Transfer the browned butter into a separate bowl or container to stop residual heat from further cooking it.
Making the pizzelle batter
- Whisk together your eggs, sugar, and vanilla in a medium bowl.3 large eggs, ¾ cup sugar, 2 teaspoon vanilla extract
- Now add your flour, salt and baking powder and mix it well until there are no lumps and it looks smooth.1 ¾ cups all-purpose flour, 2 teaspoon baking powder, ¼ teaspoon kosher salt
- Now add your melted butter and mix that into your mixture.
Making the pizzelle
- Pre-heat your pizzelle maker. They are all a little different so follow the manufacturer's instructions for this.
- Once it is heated, add a heaping tablespoon of your thick dough to the middle of each of your pizzelle areas on the iron. Close and cook for about 30-45 seconds until it is a light golden color. If the pizzelle is too light in color you can just close the pizzelle maker and cook the pizzelle for a few more seconds.
- Once they are cooked, remove the pizzelle from the iron (they will still be soft and pliable at this point) and place them on a cooling rack where they will cool and get nice and crispy. Keep doing this until all the dough is used up.
- Once all of your pizzelle are fully cooked and cooled, you can go ahead and clean them up if you would like by lightly breaking off any parts of the pizzelle that went beyond the design edge.
Meg says
Thank you for sharing this recipe